Hour Glass
Last time I posted, I said that I was going to do my next piece on the quilt block called ‘Hour Glass’ based on previous feedback. What I forgot to do at the time was to re-post the ‘Hour Glass’ blocks for ease of following the process/progress. My BAD – and my apologies for that oversight 🙂 Here is the original ‘Hour Glass’ block outline on the left.
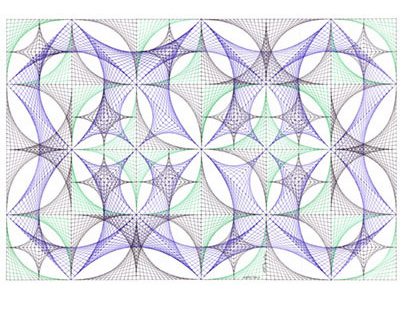
Outline of ‘Hour Glass’


In ‘Hour Glass’, I have repeated the block in a 2 x 3 grid without any spacing between the blocks. Four of the blocks are oriented in one direction and the other two blocks are oriented in a different direction. As I was drawing this piece, one thought that came back time and time again was that I kept ‘losing my block’ – no pun intended 🙂 What I mean is, that I really had to concentrate to keep track of the orientation of each block in order to keep a track on what I was doing.
With this in mind, I have uploaded an outline drawing of the blocks showing the orientation of each block as it is in the finished piece. I have left a space between each block in the outline purely for clarity. In the finished piece, there is no spacing between the blocks. The image of the finished piece is oriented in the same direction as the outline of the blocks.
Even looking at the ‘Layout’ and the finished ‘Hour Glass’ piece side by side as I write this post, I am struggling to recall how I ended up with the completed piece as it is.
In all honesty though, the two things that I really, really love about this whole process are-:
- the fact that I don’t know what the end results will be
- the wonderful shapes and interplay between the shapes and colours that jump out at me when I step away from the finished piece. There are so many times that I see something new that I didn’t see as I was working on the piece.
My Thought Process
Essentially though, my thought process when I completed this piece was as follows-:
- I completed the black sections first – a basic parabolic curve within the major sections of each block.
- Ummm… That’s enough black – I need another colour…. I think I will try purple
- There are some ‘gaps’ in these areas – if I used purple to join areas ‘xyz’ that would add some colour and it would integrate the blocks.
- OK, I have had enough of purple for now….. but there are still some gaps?
- I think I will add some green… I like green and purple together.
- There isn’t anything on the corners! That sticks out like a sore thumb!
- OK, I’ll just add some green parabolic curves to the corners and …..
- Yes, I like that now…. YAY…… FINISHED…..:)
Your thoughts please…
I mentioned above that there are no spaces between the ‘blocks’ in ‘Hour Glass’. In some of the other pieces that I have completed, I have added spacing between the blocks – see Web of Intrigue and Luck of the Irish. Adding spacing between the blocks creates a whole new layer of intrigue and possible interactions.
Would you be interested in a series of posts showing the various stages of progress of a piece? I would include progress images and a bit more detailed explanations of What I am trying to achieve/what I am thinking etc.
Please let me know your thoughts on this via the contact form below.